Welcome at FreeTime Toys

Hello everybody and welcome here. This blog will be dedicated to the few toys projects I will do during my free time. You can expect some toys rehab, some design adaptation and some brand new design.

If you are here you probably know my taste for Jumbo Machinder, so most of my projects are related to those big guys. Hope you will enjoy it.

Saturday, November 14, 2020

WH40K Sister of Battle Fanart

The story behind this project is funny. I was talking about this in my previous post.

I found an really cool artwork done by Johannes Helgeson, didn't know the character back then, it was just written WH40K Sister of Battle. I knew WH40K back from my childhood and after searching about the Sisters of Battle, I fell even more in love of the character. I always had a sweet spot for fanatic woman in armor. It also reminded me a bit of the characters from Requiem, a comic book with gothic vampire in armor. Same kind of color scheme.

And instead of starting to 3D model it, I've buy a few miniature and start painting them. But it was time to start this project and here it is.

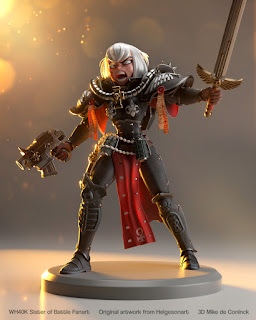
The original artwork was just of the head with a bit of the shoulders and the torso. But I wanted to do a full character. The good thing was that Johannes seems to like those Sisters as he did a few other drawings with the complete armor. I did a big mix between his style and the original miniatures from Warhammer.

The first pose was inspired by one of the miniature. The second one also with some kind of jetpack. I had a little crush when I've discover those flying units in miniature. And since it was not too hard to create an extra jetpack, I decided to go for it.

And when I've done that second image, Johannes just released a new artwork he did with a new Sister of Battle jumping into action with arms around. I really liked the set up so I decided to go for it but was too lazy to change the head to match the original artwork.

The modeling was done in Zbrush, textures in Substance Painter. The rendering was done using Maverick Render and a bit of touch up in Affinity Photo.


So all this is kind of a mix of everything from inspirational artwork to miniature. I might try to 3D print these one day now that I have them in 3D but in order to do that I still have a big amount of work to make them "printable", like thicken the clothes, fix some holes, thicken the sword a bit.

Will see when I will be able to do that, but it's certainly something I will do in a near future.

And now that she is done, I might come back to some painting, it was good to be back at it.

Wednesday, September 16, 2020

Back to my Warhammer roots

 In my previous post I was talking about painting miniatures and an old hobby. Well it seems that I've been doing a full circle and realize that almost all my creative stuff can connect together and go back to this old hobby.

When I was a kid, my older brother was playing Dungeons and Dragons with some friends and I've discover the little figures you can use as your avatar. I was fascinated by them and I've start painting them. I really enjoyed this and I've spend countless hours painting armies.

What's funny is that painting those lead me to met some people doing live role playing and since I was good at painting, I've start doing make up and prosthetic for those live role play, doing some monsters and crazy stuff. This gave me the bug for special effects. And I've jump into computer special effects a few years later and it became my job. Then for my passion of Jumbos Machinder all those prosthetic stuff I learned younger became pretty useful to create molds and painting the repro I did. Combining also the modeling skills for the 3D print I've develop during the years. And last year I decided to focus more on character modeling and go back to do things I love. When looking for a new character to model, I came across an image of a Warhammer character and decided to do it, but when digging more infos about this character I've let myself take a huge detour into painting miniature again.

I've spend the last year in Cyprus with my family and the local toy shop I was going sometimes for my kids had some Warhammer figures. I've been lurking on them every time I was going there  But knowing that we where coming back to Belgium, I've never buy any. The day after we came back, I've completely let myself go and bought everything you need to start painting again. Lots of figures, tools, paints and build a little paint station at home.

At the end I haven't start doing the Warhammer character who gave me the bug again, I need to start it but I have a big pile of unpainted figures and I want to paint them. So I will have to try to split my free time between all this, 3D modeling and painting.

The ultimate goal would be the 3D print that character when it will be finish and of course paint it. So this would be some kind of creative mix of all the 35 last years of things I've do and learn.

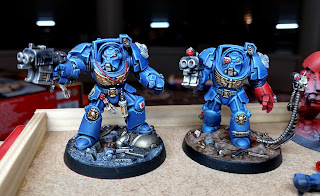
Here's some pictures of that little detour I've done. Lots of experiments for the moment, trying various ways of painting. From fast techniques to slower one, from airbrush to paint brush. And somehow even the things I've learn when doing 3D textures are useful for this and vice versa.


That's the last one I've done, the eyes give him a bit of a weirdo look, I still have to improve on this, but I really enjoyed painting the body and all the details. And of course there's so many other things I want to explore now in the miniature painting, like the artificial light source, the fake metallic effect. As usual too many things to do and not enough time.... 


And the funny thing is that my brother actually kept my miniatures from more than 30 years ago and here's a pict of them. Cool thing is that even if I haven't paint for 30 years I have the impression that I've improve a lot because of all those other things I've done during those years.


I really need to go back on the 3D modeling, can't wait to have this project pushed further and I guess it will lead to various experiments and hope to learn more and more new stuff and mix them together. But I wanted to share this story and how I've realize that everything I did all those years kind of connect together and this certainly explains why I still feel like a kid today. 

Wednesday, August 19, 2020

All things at the same place

 Well, after years of not posting anything, I'm here again.

I have been very very busy on various things like work and kids and maybe a bit too much of video games, but I had a void to fill in terms of doing creative stuff.

The robot collection kept me busy and doing restorations was pretty fun and I wanted to do something a bit different, but at the end I'm pretty sure it will lead to doing toys or statues.

For the past few months I've been spending my free time to do stylized 3D characters. I'm a good fan of Shane Olson's work, a 3D artist who's mainly doing stylized characters and I decided to jump into his course and go back to do things I like. I'm doing my job because I like 3D characters and I've been doing tons of things that have push me into various directions always linked to my passion for 3D, but not to the basic things I truly like.

So with some free time this year it was about time to do it.

Here's four images of what I've been doing, probably more to come in the future. And I have to say that when I see ho cheap 3D printers have become, it's pretty tempting to get a nice one and start printing some of my models. I have a certain idea in mind, it will take a few weeks or maybe months as I'm a bit slow on things for the moment. But I hope that this idea will come to life. It's a character based on a drawing from a very talented artist, like all the things I've done this year, but I don't know why I had a real crush on that image and I have a clear idea of how and what it will be.


So here the very first image I did when joining the 3D course.

The original artwork is from Mike Henry. He did a really good job on the lighting of his character and I wanted to capture that too. The model is done in Zbrush, textures in Substance Painter, and for the rendr it was done with Marmoset Toolbag. Also some post process on the images with Affinity photo.

All this was also a good occasion for me to try to learn new tools and expand a bit my skills. I've spend so much years supervising people, that at some point I didn't had time to use the latest tools and there's always been some kind of frustration to not touch the images anymore, even if supervising is important, doing things is quite satisfying too.


The second project is some kind of cross over between a statue from Sideshow Collectibles and character design from Josh Black. I came across a really nice fight scene between Batman and Superman, really dynamic but more in a semi realistic comic book style. And I saw some great design of the Justice League made by Josh Black and I really liked the styles of his characters.

So this is the result of the mix of all that. That one also gave me the idea to maybe print it for me one day as it might look bloody cool if it's well painted.

Once again it was modeled in Zbrush, with textures in Substance Painter and the render was done in Marmoset Toolbag with some post process with Affinity photo.


And here's the third one. It is based on a design from Creature Box. There was some contest a few years ago in the course I'm doing and the theme was to pick a design from the guys at Creature Box. They are doing really amazing things and that specific contest was one of the things that I really liked about the course. The idea that there's some themes like that to push the students.

So I decided to pick one, even if that contest is long gone, but just for the fun of it and that character is pretty crazy. It was done for some game character for Ratchet and Clank

Here again, the usual trio of 3D software and Affinity to give the final grade and touch up.

It's kind of funny as I've been working at the office with Maya and Photoshop and I'm going another way for my personal stuff. This is mainly linked by the fact that those two are pretty expensive and also by the fact that I like to explore things and learn new software. I've also experiment a bit Blender for the render as it start to give nice results since a few versions.


Ok, now the last one I did was more for doing a female character. Somehow since I'm a kid I've almost never draw female characters. Always super heroes, monsters, spaceships all those nerdy boys stuff. I wanted to leave my comfort zone and try it and I came across a nice artwork from Sacha Tudvaseva. I decided to give it a try, it was slow as I was really not confident. But at the end, she looks pretty cool I think. For that one I did a first version of render with Marmoset Toolbag but last week, our beloved Shane Olson did a render using Maverick Render. It's a recent software and after downloading the trial version of it, I decided to go for it and test it properly with my Snake Girl project.

So here's the result of that experiment


So even if this blog has been dead for some years now, I wanted to do this post so everything is at the same place, and even if this is not toy related anymore, it's still about doing creative stuff during my freetime.

And speaking about old hobby, for the moment I've start painting miniature figures like I was doing 30 years ago. Might do a post about that when my experiment with modern painting techniques will be done. Somehow even if it's a different medium, I have the impression that all this is linked, but like I was saying it could be a nice topic for a future post that probably nobody will read :)

Friday, August 9, 2013

Gold is a HUGE pain

I was maybe happy too early with the second version of gold. When I've check it in the morning with day light, it was more like a bronze color. I've clearly add  too much red to the gold and the result was not that great.

After a day at work, thinking of it and how not accurate that was, I decided to go for a third attempt on the gold. But this time with more testing before going with the airbrush.

After a few attempt I've manage to get something more close to the original, more yellow gold. So I've decide to go for it. The result is kind of ok, but I've probably add to much colors to the gold to get something more close and it has remove a bit of the metalic look of the gold paint. So it's more like a metalic mustard color now, but it looks good enough.

Now, I need to finalize that launcher but that will be for after my holidays. Now it's time for a cool break and some rest.

So here's a few pictures of the paint. The first one is with the bronze look.


And that one is with the last gold attempt, the pict is a bit too saturated but it's more or less like this now.


It's way more accurate when I compare it with the image reference I have of it, and the mix of colors is more balanced.

And here's another pict with other light conditions. I really need to do more pictures of it but that will have to wait a bit.


Tuesday, August 6, 2013

Gold is a pain

Painting is done, but it was not that easy. Well, yes it was, but the gold was really different once painted. It looked nice inside the bottle and the color reference was nice also, but when it was painted it was more "champagne gold" that usual gold. And of course since I'm doing the paint in the basement with not a good light condition, it was only visible in day light. Everything looks warmer down there.

So I've add a bit of red and a tiny bit of yellow to kill that champagne look and I've redo the whole gold paint. And the result is reallu how it should have been in the first place.

I just have to put the semi gloss varnish on all the pieces and it will be done. And of course a bit of work on the launcher mechanism.

So here's a quick pict with poor lights but just to have a sneak peak of the head paint.


The red and the blue are super flat for the moment, but after the varnish it will have the perfect look. Hope that it doesn't rain tomorrow morning so I can do this before going to work.

Monday, August 5, 2013

Quick update

YEEESSS the sanding is done.

Well, this time it was easier as there's a lot of area that doesn't really require sanding as the idea is to keep the grain.
I had some time this morning to put the primer coat and it actually looks pretty cool. It's the first time I use a primer on my big replicas because it's so sanded that the surface is more than ready for paint. Since it's not the case, I wanted to be sure and put a primer on it.

It's fun to see it like that as my modeling previews are also in gray, so it's probably the closest he will look to that.

Now it's time to play with the airbrush and see how it goes. I'm a bit in a rush as I want to have it finish by the end of the week so, every little hour here and there is nice.

Here's some picts with the primer.


I wanted to share those as it's easier to see the volume of the sculpt as now it's of course less translucent. The 3D print quality is really amazing.


And here's a little extra. I've work on the stickers for the eyes and I've make a quick version to print with lots of eyes with little variations so that after it's printed, I can choose which one looks the best. This image iteself is pretty nice, some kind of mix between Verner Panton and Vasarely.

Friday, July 26, 2013

Lenzari finally there

Yes, he's finally here. After hours and hours of work on the modeling and finding a way to print the grainy surface, Lenzari is here. I was sooooo anxious about the print. Even if the test came out great, there's always a chance that it's not printing properly again. And there was a few hard decision to make regarding print orientation and the chances that it's coming out weird.

And before talking about this guy, I still don't know how to spell it properly. I think that normally it's Lensari, because his name comes from Ari in Japaneese for Ant and Lens for his lens shaped eyes. But I honnestly prefer to write it Lenzari because it looks better. I love to have a Z in a word hahahahahaha.

Well, the final result is really nice and once again I have to thank all the team at i.materialise for all their effort and the quality they continue to level up each time.

What's interesting is that I was afraid of the grain surface but actually that's what came out the best. Almost no need of post process on those parts.

Enough talking, here's a few picts of it.


 The choice of orientation I was talking before was mainly on the body. When you 3D print something with almost all printer, there's visible print layers. If the body was printed in a vertical position, with the curve of the shoulders there might have been little print layers on the shoulders and it would have been almost impossible to remove them. I would have to sand it and this would remove all that grain for which I've spend so many hours to get properly. The idea was to print in standing on the side. This way, the tiny print layers are on the left and on the right under the arms on the character.


 On this picture you can see on the right side of the body, sime little pegs. Those are the remaining parts of the support structure.
During the print process, the parts are not self supported, so there's some kind of support structure build around the piece to support the weight and it's connected to the piece with little pegs like this. I was afraid that too much structure will be needed for this print. But it turns out that not so much was necessary. That's really the good news of the day.


You can see how detailed is the print here for the grain surface. And as you can see there's also the little pegs under the head as this parts was printed vertically. One of the stupid thing that really excite me with that project is that there's stickers for the eyes. Until now, all my villains were fully painted and no stickers at all. But for that one, the final touch will the the stickers for the eyes.

One of the little detail that I'm not really happy is the lines on the arms. Actually it's not as deep as the one on the legs and on the head. It could have been a tiny bit deeper. Hope that after sanding the arms it will still look good. As it might be even less deep after sanding the arms to be perfectly smooth.

Here's more picts of this bad guy.


Next step will be the ultra boring sanding process. But the good news is that there's a lot of grain surface on it that doesn't require sanding. So it will be mainly the legs and arms and of course his amazing launcher. For that one I still need to figure out how to make the metalic cover but I have some ideas somewhere in my head.

And for that one, I've decided to paint it myself. It's one of the fun part of the process and I was a bit sad to let it go for my Garada and for the Green Ghost. So this time I will keep some fun for me. Just hope I will be able to do it perfectly. But it souldn't be that hard. My airbrush skills might be more than enough for it.

Thanks for reading and stay tune for the next step.

Tuesday, June 25, 2013

Test print side by side

This is another chapter in my quest for the perfect Lenzari replica.

So, after trying to do the grainy surface on the 3D model I had to test it with a 3D printer to see how it will come out.
I was not really sure about all this and if the printer I've use in the past for the big size stuff will have enough resolution to print that grain.

After a few exchanges with the great support team of i.materialise, I wanted to test two printers: their regular SLA printer and the Connex from Objet.

On paper the Objet is really more accurate and seems to be a good choice. But this service is only available with the Vero White material of the Objet printer. Since I had some good results in the past with my mini vilains I wanted to try it also for this test.

The only problem thing that I was afraid and who might stop me is that I can't sand my pieces to get them perfectly smooth since the idea is to have a grain and if I sand them, it's going to remove the grain.

Here's a few images of the raw prints.

Those first images are from the Objet printer and as you can see it's really hard to judge the level of detail. It's actually one of the problem for me of this material, the light is really passing trough and it's hard to see the surface quality.


As you can see it's just one small part of the body but it's enough for this test and already quite expensive.

This second serie of images is from their SLA printer with the material called "paintable resin". As you can see, the surface looks pretty nice and regular and the grain is visible and the print layers not that much.


It's also a bit hard to judge the print quality so the best way to check all this was to put a primer coat on both test pieces.

I wanted to be sure that the primer will stick perfectly so I decided to sand each piece smoothly with a 600 grid sand paper. Just to prepare a tiny bit the surface. And I've also do a quick sanding with a 1200 grid.
IAfter that, I've put two coats of primer and here's the result:


The Objet print is on the left and the print layers are highly visible, the surface quality is far from perfect. And on the right, it's the SLA print, almost the challenger for me on that one and the result is really nice. The print layers are almost invisble, the grain comes out great.
There's no comparaison possible here, it's a total no match.
And as you can see, the primer is really going well on the surface, so the "paintable resin" is really the perfect name for this material.

Here's other close up pictures of each pieces.


 It was really a good plan to make this test as I was able also to see how my grain will come out and that I needed to refine it a bit to be more close to the original. The level of details is really nice and I'm sure that I can have something that will look close enough to the original.

Now I need to finalize all the model with the new grain, I've also decide to add some grain on the knees and elbows parts as it seems that there's a tiny bit there also.
And also a very big check on all the connections parts as the modeling of the grain tends to shift a bit the whole surface.

That's a bit it for today's post. A bit technical but it's good to have some behind the scene stuff like this also.


Wednesday, May 29, 2013

To print or not to print

People who know the Lensari Jumbo Villains, know that his surface is not smooth. The body is actualy with some kind of grain texture on it and some parts of the head also.

To get the same kind of effect, I'm hesitating between two different techniques. The first one would be to print all the parts as smooth as possible, and then cover them with putty and sculpt the grainy surface on it. Maybe with some kind of rocks who have the same texture, by pressing smoothly on the putty.

The other option is to try to 3D print it directly with that grainy surface. Well, that kind of grain is probably too small for the level of detail of most of the printers out there. But I've decide to try it. Not on the whole surface of course, but to print a tiny part with that grain surface.

But before doing this, I had to figure out how to do this grain surface on my 3D model. After a few hours on another 3D modeling software, I was able to get a decent result. The downside of this is that you really need to have a super high level of detail in your mesh to get a clean result. So my model is now close to 20.000.000 polygons. That's probably the highest I've ever make for a single character. I think that the smooth version have 10 times less polys.

So here's an image of this quick modeling test. I'm planning to print the half of the upper body part for the test. Could be interesting to see how it manage to print the grain on the almost horizontal surface.


And of course depending on this test, I will see which option I choose. I'm really curious to see how it will come out.

Thursday, April 11, 2013

RokuronQ9 Final Model

So, after long hours of adjustments and tweaking, here's the final model of the revised version of Rokuron Q9. I have to say that I'm pretty happy with this version as I've had some frustrations with the first replica like I've explain before.

The first one was a good opportunity to test the technique and see how I can work with that. It actually opened lots of perspectives and ideas so it's cool. But I wanted to have something more close. Like for Garada, trying to capture the soul of the original toy and what is fascinating about it was a good challenge.

There's maybe a few things here and there that I will improve and of course I will have to make all the usual technical modeling before launching any 3D print. And all this will probably wait a bit as it's time to go back on Lenzari and finish that part for him.

So here's the images of the Rokuron. I will probably try some more because it seems that the lens I use distort the one on the side a bit too much, so might have to adjust that. They look a bit weird to me for the moment.